Showing posts with label Brayering. Show all posts

Friday, 20 May 2016

The Wilderness Awaits Day 5 Doggy Congratulations

Hello and welcome back....

Today's card features the gorgeous Dog from the stamp set The Wilderness Awaits.... with a little bit of Wetlands thrown in....lol


I am so loving this set, in fact both this set and the Wetlands set are a firm favourite.. so I am a Happy Bunny knowing that both of these set are in the New Stampin'Up! catalogue due out 1st June.....  :)


The base card for this one is Crumb Cake with a layer of Early Espresso and then Whisper White. I used the 2 1/2" circle punch to create a mask to which I brayered Daffodil Delight and Crushed Curry, I then added a 1" circle to mask out the sun and brayered Pumpkin Pie and Cajun Craze over. I removed the 1" circle and stamped the grasses from the Wetlands set in Basic Black. Then I removed the larger mask.


I stamped the dog in Basic Black overlapping the coloured area and then stamped him again on a separate piece of Whisper White and cut him out. I then stuck over the stamped image on the card. The sentiment is from the stamp set Curly Cute (retired), but you could use any sentiment with this card.


I layered a piece of Burlap Ribbon across the bottom of the card and then layered the Whisper White card which I had shaped using the scallop border punch on top.


Product List

I hope you like today's card, thanks for stopping by....
Happy Crafting X

Sunday, 7 February 2016

Honeycomb Happiness Day 7

Hello and welcome back.....

Today is the last day of Honeycomb Happiness (sad face) I could go on and on as I have only scratched the surface of this gorgeous stamp set......
So on to today's card..


I so love this little bird and it will only be available until the end of March so if you love it like I do then you need to get it soon..


The card base is Thick Whisper White and then I have used a piece of Whisper White which I have brayered with Soft Sky on the top and Pear Pizzazz on the bottom. The sentiment is from the stamp set Teeny Tiny Sentiments which I stamped on Whisper White and cut out with the Word Window Punch.


I stamped the bird in Basic Black and brayered over it with Daffodil Delight, then I did shading with Crushed Curry and a dauber. I coloured the beak and feet with a Pumpkin Pie Marker and added a tiny dot of White Gel Pen to the eyes.


I used another Free stamp set for the background, Flowering Fields, it has some really pretty flowers, I stamped them in Pear Pizzazz and then went over the different types with a different green for each one. I used Pear Pizzazz, Garden Green and Always Artichoke. For the yellow flowers I went over the flower with Crushed Curry and coloured them in with Daffodil Delight and then I went over the petals with a White Gel Pen. 


I used Always Artichoke to create the darker stems and the White Gel Pen to create the white puffy flowers. Lastly I added two butterflies which I had stamped in Basic Black and coloured in with Pacific Point and Marina Mist ink.


I put the Curvy Keepsake Boxes next to the card to show how different the birds can look by stamping them in a different colour..... I think the ones on the boxes are my favourite... which are yours?

I have listed all the products used below...


I hope you have enjoyed this week of Honeycomb Happiness pop back tomorrow for something New...
Thanks for stopping by...
Happy Creating X

Tuesday, 19 January 2016

Rose Garden Wonder

Hello and welcome back...

This week Is all about the New Rose Garden Bundle, the Rose Wonder Stamp set and the Rose Garden Thinlits dies, buy them separately and pay £52, but buy them as a bundle and pay only £44......awesome and I do love a bargain.

So here is the first card...
 
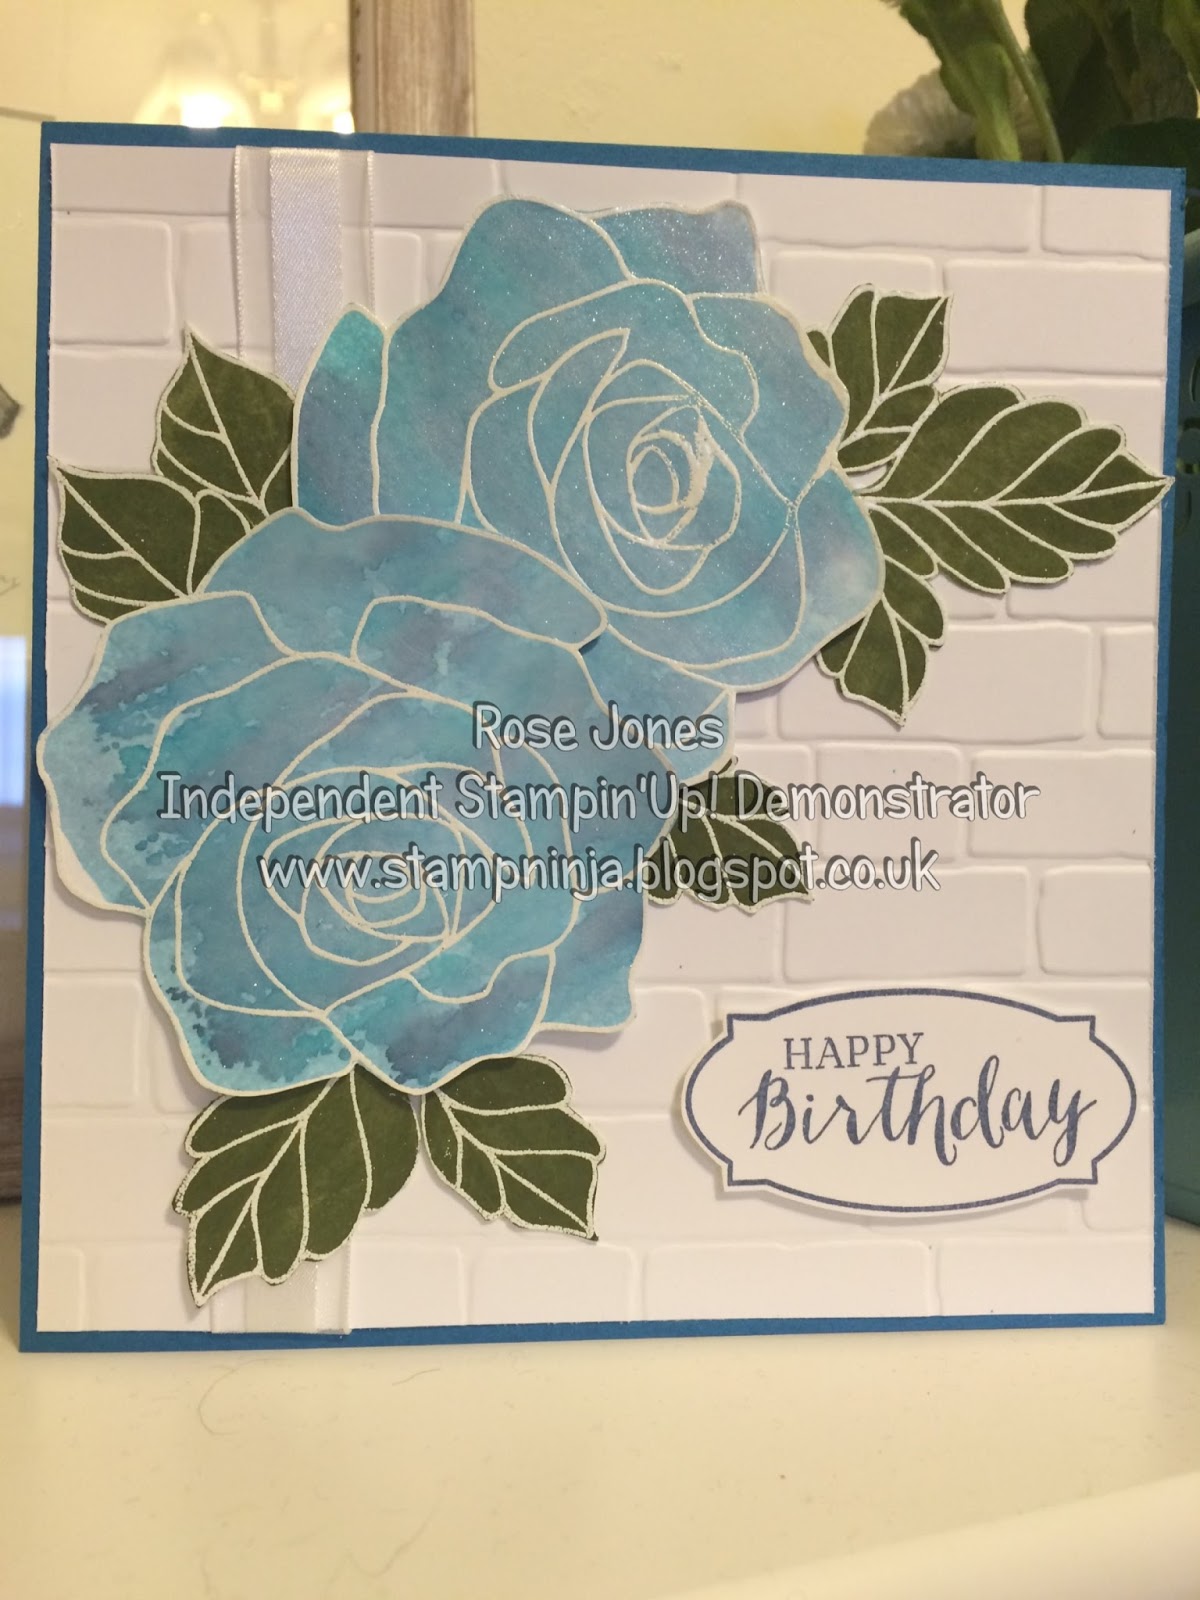
I have used the gorgeous stamp set to create this card, it's a larger than normal card (6" x 6"), the base card is Pacific Point with a layer of Whisper White which has been embossed with the Brick Wall Embossing Folder.
 
 
For the roses I stamped the image on Whisper White card with versamark and heat embossed with white embossing powder. Then to colour them I used the Acrylic block watercolour technique (see previous posts) using Pacific point, Night of Navy and Bermuda Bay Inks.

 
I stamped the label and greeting and cut it out using the matching die, then popped it on the card with dimensionals.

 
The leaves I brayered with Mossy Meadow ink and then wiped the embossed lines clean with a tissue, quick and easy. I added a piece of Whisper White Organza Ribbon down the left side and layered the roses on the card with dimensionals. Then I added the leaves sticking them down with Tombow.

 
Lastly I used the clear Wink of Stella Glitter brush to add some sparkle to the roses.

All products used are listed below, if you order this bundle and maybe add a Wink of Stella Glitter Brush and you would then be able to choose a freebie from the SAB Brochure....and that's in addition to the saving you make on buying the bundle. Plus don't forget to add the Hostess code to receive more goodies from me.....


Thanks for stopping by come back tomorrow for Curvy Keepsake Wednesday and Thursday for another Rose Garden card.
Happy Crafting X

Tuesday, 1 December 2015

A Hug from Santa...

Hello and welcome back....

I am loving the Christmas Stamp Set Santa's Gifts, it has such cute images.... Here I have been using it to make some more tags for Christmas Gifts...

 
Are they not adorable...I think so... Santa is giving Rudolph a big hug to say thank you for another great year...

 
To make the tag I cut 9 tags from one A4 sheet of Thick Whisper White Card, they are approx. 7cm x 10cm. Then I punched a slot at the top using the Curvy Corner Trio Punch, and using the same punch I punched the rounded corners. I brayered the top part of the tag with Soft Sky Ink and stamped the sentiment in Basic Black at the top.

 
Then I stamped the Pine Trees from the Happy Scenes Stamp set in Garden Green and added some snow effects using the White Gel Pen.

 
I stamped Santa, Rudolph and the little Bird in Basic Black and fussy cut them out. Then using my Blender Pen and ink pads I coloured them all in. I added some glitter accents to the Birds scarf and to Rudolph's scarf.


I coloured the white bits of Santa with the White gel pen and added some glitter to his hat and coat trim. I used a silver sharpie to colour his belt buckle. I put a little glitter on Rudolph's nose as well. So that Santa could give Rudolph a hug I cut down Santa's arm so Rudolph can fit in. Then I put Santa on the tag with dimensionals and stuck Rudolph's body to the tag leaving his head free. Lastly I popped the little bird on top of the tree.

 
I have listed all the products used to make these tags below, just click on an of them to go to my online store...


Thanks for stopping by...
Happy Crafting X

Tuesday, 3 November 2015

Believe

Hello and welcome back....


I really love today's card, it's just so Christmassy..... Do You Believe in the Magic of Christmas.....


Today's card is a beautiful brayered card inspired by Michelle Zindorf... The colours are Night of Navy. Island Indigo and Pool Party. The bottom of the card has been masked off with some scrap paper ripped into the shape of hills or snowdrifts what ever you want them to be really.

 
I sponged the moon with White Craft Ink and edged it with a white gel pen, then I stamped Santa and his reindeer  in Basic Black and added sparky magic beneath their feet with a white gel pen.

 
I stamped the trees from the Wonderland Stamp Set in black, using my mask to give different levels. Then I used a white gel pen to create highlights on the trees.

 
Lastly I stamped Believe in black on whisper White and punched it out with the word window punch, I added a second word window behind the white, punched out of Lost Lagoon card.
 
It's so, so pretty it makes me feel all Christmassy.....lol

All the supplies needed for this card are listed below, just click on the picture to order.


Thanks for stopping by....
Happy Crafting X

Friday, 30 October 2015

The Wilderness Awaits Birthday Greetings

Hey there, welcome back...

Today's card features the beautiful stamp set The Wilderness Awaits and more specifically the Elk, which is simply gorgeous..

 
I have been practicing my brayering again and I think I'm getting better, I seem to have less lines now and although you can't see very well with the photo my gradients are getting a lot better....

 
I used Crushed Curry and Daffodil Delight for the background, I masked off the sun with a 1 3/8" circle cut from sticky back post it tape, (it comes in a roll and the whole back of the post it is sticky not just the top, so is ideal for this sort of thing.)

 
I stamped the Elk in Basic Black and then used a marker to carefully colour it in black creating a silhouette. I used a White Gel Pen to create the highlights....

 
The ground on which the Elk is standing has been extended to the bottom of the card and coloured and highlighted and some of the Basic Black Stitched Satin Ribbon wrapped around the card.

 
I just love how this card came out, it will make an awesome male birthday card. 
This card was inspired by one that Michelle Zindorf had created, check out her website for some great tutorials for brayering and sponging...


Hope you enjoyed today's card thanks for stopping by....
Happy Crafting X
Thursday, 29 October 2015

Afternoon Sun in the Wetlands

Hello and welcome back,

Today I have gone back to the days of long hot Summers for this gorgeous card, it was inspired by one of Michelle Zindorf's creations which are just beautiful.

 
For this card you need to punch a 1 3/8" circle out of two post it notes and stick to a piece of Whisper White 9 1/2cm x 13.9cm. Then brayer Crushed Curry ink top and bottom and then add a little Soft Suede to the bottom as per the card above.

 
I stamped the Birthday Greetings from the Wetlands set in Early Espresso ink.

 
 And then stamped the birds under the sun and some grass at the bottom.


Then I added some highlights with a white gel pen to the grasses and the birds.

 
 And sponged a little Crushed Curry in the center of the sun.

 
And voila a beautiful wetlands scene.........

Hope you like today's card thanks for stopping by....
Happy Crafting X

Saturday, 24 October 2015

Hopeful Thoughts Setting Sun

Hello and welcome back.....

Today's card is a little break from Halloween and Christmas....It uses the lovely Hopeful Thoughts Stamp Set...

 
The card base is Chocolate Chip with a Whisper White Mat and then the brayered card.
I masked the sun using a circle punched out of two post it notes, then I brayered from the top in Crushed Curry to just below the sun, then I added some Pumpkin Pie and finally some Cajun Craze.
 
The bottom portion was Brayered first with Old Olive and then Mossy Meadow. The tree was then stamped in Basic Black so its branches overlapped the sun. The sentiment is from the Sassy Salutations Stamp Set punched out with the Decorative Label punch.


 To get the mat under the sentiment I punched out two Decorative labels in Rich Razzleberry, I cut one in half horizontally and the other in half vertically and then stuck them behind the sentiment label offsetting them slightly..


Thanks for stopping by, I hope you enjoyed today's card....
Happy Crafting X