Hello and welcome back.
Today I have some really cute cards to share with you, made using dies and the Playful Pals bundle, the inspiration came from Brenda Quintana who has designed several animal shaped cards, she has Free Video Tutorials that you can follow, you can find her blog HERE
I decided to make a cat card first and it had to be a Silver Tabby so this is what I came up with....
Isn't he adorable, each card follows the same basic steps so once you have mastered one you can then tweek it to suit your needs. To make these cards you will need the Ovals Collection Framelits, the Circle Collection Framelits and the Playful Pals Bundle.
To make the base card which is the body you will need a piece of card 6 1/4" x 2 1/2", for my cat I used Basic Grey card. You score the card at 3 1/8" and fold in half. Place this on the Big Shot with the fold at the top and then put the 3rd smallest Oval die on it so that the top of the die overlaps the folded edge. This will give you an oval card with a flat top where the fold is.
For the rest of the cat you will need:
From the Ovals & Circle dies: 4th smallest Circle for the Head (x2) and the Smallest Oval for the Legs (x2) and the 3rd & 4th smallest Ovals for the tail (x1).
From the Pyramid Pals Dies: small leaf shape for the Ears (x2) and the small Oval for the Paws (x2).
All pieces have been sponged with Basic Grey ink before assembly. To get the markings for the Tabby cat, there is a stamp which is the inside of the ear but can be used to make the stripes as shown, I used a Basic Grey marker to add some to the tail and paws.
For the face I used the stamps from the stamp set except for the eyes which i punched out using the 1/4" and 1/8" punches.
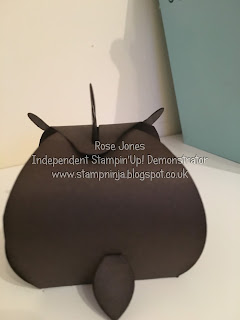
The back view shows how the Ovals for the legs have been placed and also the tail. I used the secon circle on the back of the head after I had stuck the ears on to tidy it up a bit.
And there you have it a really cute cat shaped card,You could also stick this to a basic card front if you wanted a more regular shaped card, it fits perfectly on a A6 card.
Here is the Bunny shaped card made in the same way just using slightly different pieces
Again I chose to use different eyes which I punched out using the 1/4" circle Punch.
Love his little bunny tail, its made with the die which is supposed to be an ear but its also great as a tail....lol
Such a fun use for all these dies, I should have played with this set sooner I could have made really cute Easter Bunny cards.
Product List
These little cards were such a lot of fun to make I do hope you will have a go, if you need any supplies just click on the product pictures above.
Thanks for stopping by....
Happy Crafting X


