Tuesday 30 June 2015

Cute Farm Yard Critters - Part 1

Hello there and welcome back,

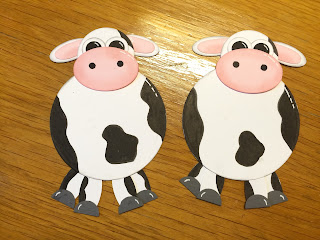
Today I have some really cute shaped cards to share with you, they are part one of three  of my Farm Yard cards, The first being these lovely cows, and aren't they cute.


They are made using Stampin'Up Circles Framelits and Circle and Oval punches.


To create the main card take a piece of card and fold in half, place the Largest Circle Framelit so it overlaps the fold and put it through the Big Shot. This will give you a round card with a flat top.


I love them, I think they are so cute.....


Apologies for the poor photos I am in London for a week.....
Pop back tomorrow for part 2 
Thanks for stopping by...
Happy Crafting X

Sunday 28 June 2015

From Land To Sea Card in a Box

Hey there and welcome back....

Today I thought I would have a go at making one of those card in a box thingys... I had thought that they looked a bit complicated but actually they are super easy...

So I have seen lots of different designs, but since I live by the sea I decided to use the gorgeous new stamp set From Land To Sea and make a nautical one...


Looks pretty cool doesn't it......


I used Night of Navy, Bermuda Bay and Island Indigo Card Stock and Night of Navy Ink for the stamping. I stamped and cut out the images and then arranged them in the box....


And the brilliant thing is it folds down flat for posting...


The outside of the box, top is Bermuda Bay and bottom is Island Indigo stamped with Night of Navy using the Hardwood Stamp.


The back is left plain so that I can write my message on it..


I love it and so how is it made? well check out this video


Once you know how to make the basic box the sky's the limit...lol


Thanks for stopping by....
Happy Crafting X

Saturday 27 June 2015

Beautiful Butterflies

Hello and welcome back,

Today's post is all about Butterflies, Beautiful, Beautiful Butterflies......lol..

I have used the Butterfly Basics Stamp Set and Butterflies Thinlits dies... which you can buy as a bundle and save 15%, details are at the bottom of this post.


The Colours are Melon Mambo, Pumpkin Pie and Crushed Curry, Bermuda Bay and Pacific Point. I created the coloured backgrounds by taking my stamp pad and pressing it onto an acrylic block, then spritzing it with water and finally pressing onto some Whisper White card stock. It is similar to the other technique I have been using with the pens.


It gives you a similar effect but a more intense colour, I am not sure if you can see it but there are little dots on the coloured card, I used a blender pen to take out a little bit of the colour.

The envelopes are stamped with butterflies from the Butterfly Basics and Gorgeous Grunge Stamp Sets.


 The sentiments are also from the Butterfly Basics Stamp Set.


To create the 3D butterfly, I put the top layer of Whisper White through the Big Shot with the small butterfly die placed in position.. Then put the coloured card behind and then stuck just the middle of the butterfly back in the cut out of the butterfly....


I have used both Whisper White Card Stocks, the thick for the card base and the thin for the layers...


So very very pretty......


I hope you like today's cards, thanks for stopping by...
Happy Crafting X
Friday 26 June 2015

Wetlands - Thinking Of You

Hey there, welcome back,

I've been having a bit of trouble doing this post, the internet is a bit wobbly...lol..
So what have I been up to.....I have been doing the technique where you colour your acrylic block using your Stampin'Write Markers, then spritz it with water and you get a beautiful water colour effect background....I really love it..


The colours I used here are Pacific Point, Bermuda Bay and Crumb Cake.


 Then I masked off the edges using Post It notes..


 And stamped the little birds, the grass and the sentiment from the Wetlands set.


 Next I mounted it on the card base which is the New thick Whisper White.


And as the card is 6" x 7" I made my own envelope using the Envelope Punch Board, and of course stamped the little birds on the flap.


Such a beautiful set, I really don't tire of seeing these gorgeous images....


If you are thinking of doing this technique I would recommend Whisper White Card Stock as it soaks up the liquid to give that beautiful water colour effect, other card stocks don't work as well and the pens need to be water based, permanent markers won't work.
Check out this video HERE for more help.


So I hope you liked, thanks for stopping by....
Happy Crafting X

Thursday 25 June 2015

By The Tide Stationery Set

Hello Peeps and welcome back,

Today I have a Stationery Set made using the By The Tide Stamp Set and it matches Tuesday's post.......


I really love this colour combination, it so makes me think of the beach......the sand and the sparkling sea.....

First we have a notebook made using my Bind It All Machine, I have covered the board with Crumb Cake DSP, then I have stamped it with Crumb Cake and Tempting Turquoise Ink using The By The Tide and Gorgeous Grunge Stamp Sets. the little Sea Horse has been stamped, cut out and then covered with Crystal Effects.


There are two sections in this book and I made little dividers to separate the lined paper from the plain paper and of course had to make a pen to match...lol


Then we have a Match Box made with Tempting Turquoise Card and DSP. The shell on the top has been stamped, cut out and then covered with Crystal Effects.


Inside is an assortment of pretty paper clips. I made a belly band to stop the MatchBox opening and spilling out the contents......


Next we have a Post It Note Holder, which has been made using Crumb Cake Card and Tempting Turquoise DSP.


I have used little Velcro dots to hold the pad closed. I think I am going to swap the yellow Post It pad for a blue one..... Note to self, add to shopping list.


To finish the pad off I cut a piece of Whisper White and stamped it with the By The Tide Stamp Set added some Linen Thread and some pearls....Pretty...


Lastly I've made a little Tic Tac Holder with the scraps of card and DSP I had left....so cute...


Then I popped them in the Hand Bag and they are ready to give to my newest recruit to welcome her to my team The Rosebuds....


I hope she likes them.... if you would like to join my team now is a great time to do it. Up until the end of June 2015, not only do you get £130 of products of your choosing for £99, but you also get TWO extra FREE stamp sets of your choice as well. You don't have to demonstrate you can just enjoy the 20% discount you get for being a demonstrator.
Plus you get access to a wide range of help, support and inspiration not just from me but also the whole Stampin'Up! family.
Check out the JOIN ME tab at the top for more information....

Thanks for stopping by...
Happy Crafting X

Tuesday 23 June 2015

By The Tide Hand Bag and Card Set

Hellooo and welcome back,

Today's little project is a gorgeous Hand Bag and matching card set...


So I made the Hand Bag the same way I did with all the other Hand Bags, if you don't know how they are made check out this video HERE


I used Tempting Turquoise and Crumb Cake Card Stock and DSP (Designer Series Paper) to make the Hand Bag, the brads I used are Stampin'Up! but are sadly retired....


To make the Bag Charm, I used the 2 3/8" Scallop Circle Punch, layered with a 2" Circle in Crumb Cake and a Whisper White Stamped 1 3/4" circle. Then I stamped the little seahorse, cut it out and then added some Crystal Effects.


Here are the matching Cards and Envelopes.....


 I love the New Thick Whisper White Card Stock, it is perfect for single layer cards...


The Stamp Set is By The Tide, I stamped using Crumb Cake and Tempting Turquoise inks...


 I added some Linen Thread and a Designer Button (Brights).....


Finally I added some Basic Pearls and voila all done...


Love how it all turned out...


Hope you like, thanks for stopping by....
Happy Crafting X