Showing posts with label Leaflets Framelits. Show all posts

Tuesday, 6 October 2015

Sunflower Basket

Hello and welcome back....

I thought I would make some more Baskets using the Berry Basket Bigz L Die and as its Autumn and the Sunflowers are starting to fade I thought that would be a good theme...

 
I just love Sunflowers, they are simply beautiful....

 
I made the Sunflower with Leaves from the Leaflets Framelits, the long narrow one, I cut out 12 out of Crushed Curry Card Stock. I cut them down as they were too long and also made them a bit narrower, then I sponge daubed them around the edge with Chocolate Chip ink and stuck them to the back of a 1 3/4" Choc Chip Circle.

 
The center of the flower I stamped with spots and daubed around the edge with Choc Chip ink. I stuck it to the basket with glue dots...

 
The basket on the left has the flower which I didn't slim down the petals so were a bit chunky....


Love this little basket, I'm going to give them away filled with cookies....yum.. yum...


Hope you like, thanks for stopping by.....
Happy Crafting X

Monday, 5 October 2015

Christmas Rose

Hi there and welcome back..

I have a beautiful flower to share with you today and its super easy to make... All you need is one of these...Stampin'Up! Fun Flower Punch.. Not got one just click on the picture at the end of this post to order one....


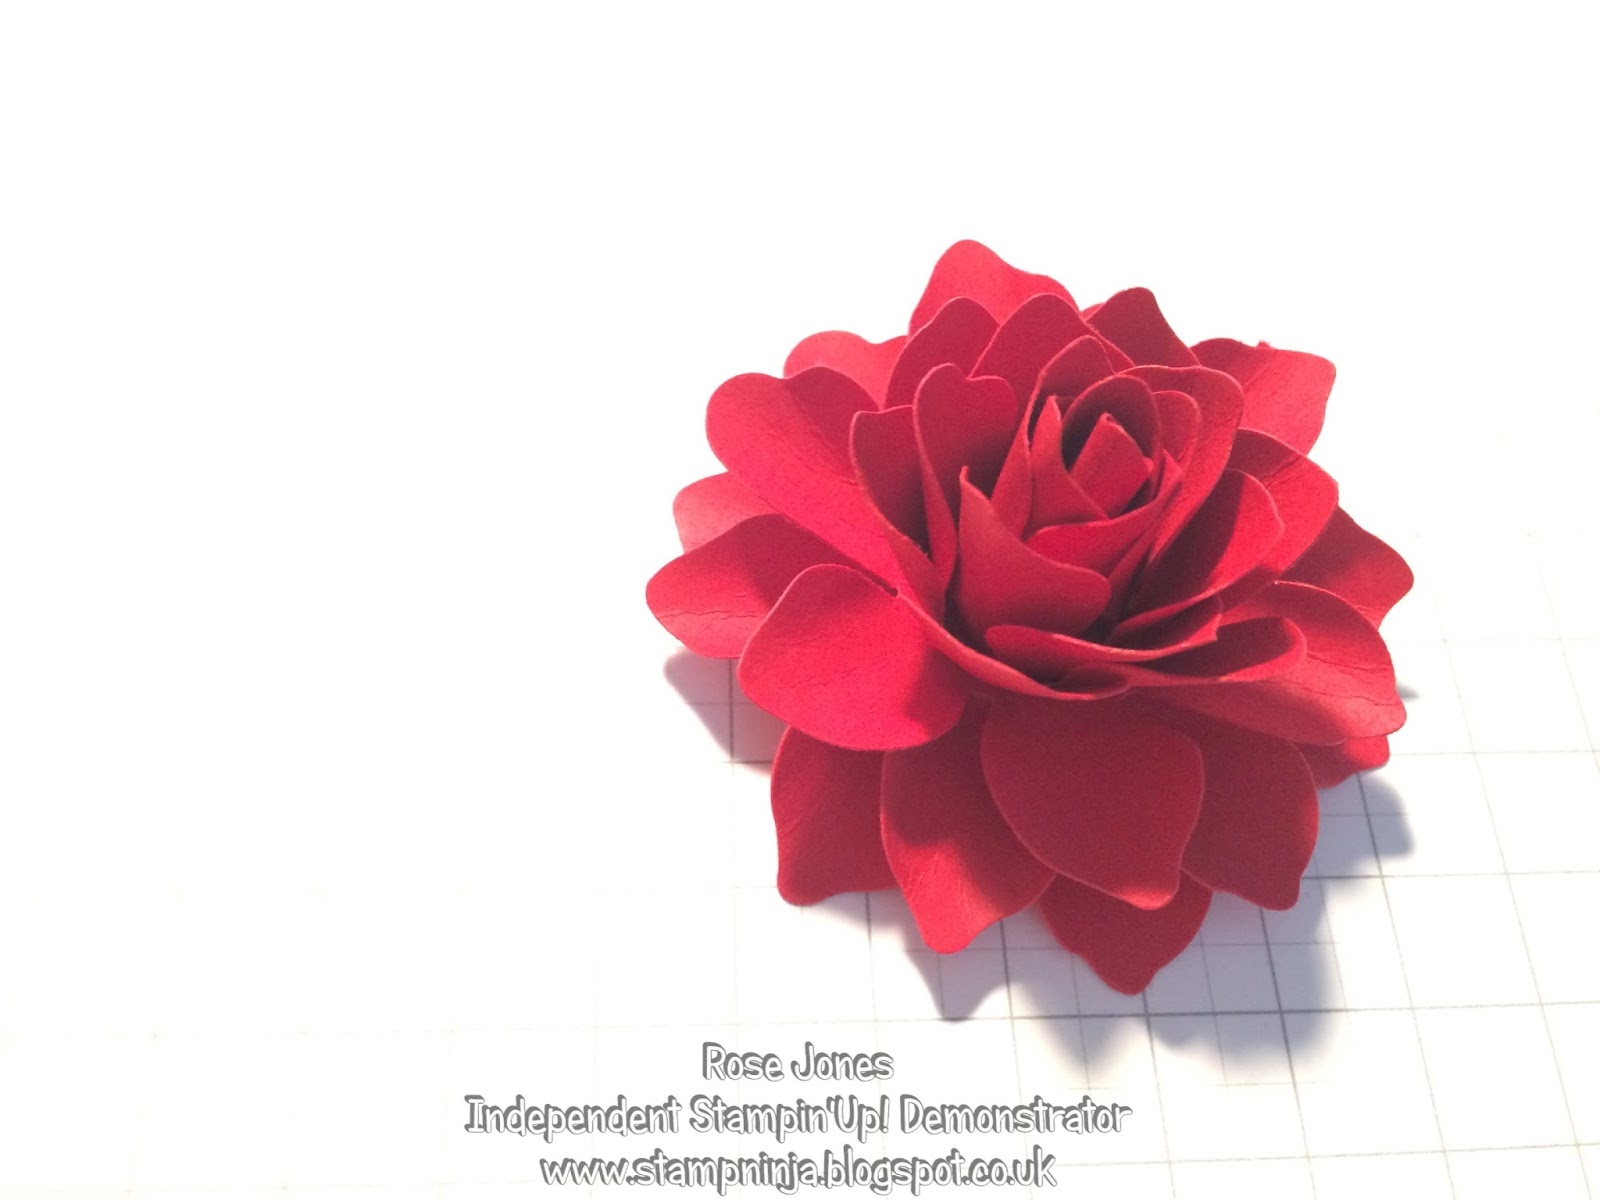
Aren't they just gorgeous, I'm calling them the Christmas Rose but you could make them in any colour for any occasion.. And here is how to make them...

 
First punch out 6 of the Fun Flowers... in what ever colour you want I used Real Red and Cherry Cobbler...

 
Then using your paper snips cut between each petal, making sure you don't cut all the way through...
 
Then using a paint brush or something similar you are going to curl the petals around the handle like so...

 
Then put 3 flowers aside and starting with one petal curl it around really tight and glue it..
 
Bring up the opposite petal and add a tiny bit of glue to hold it, carry on until all 6 petals have been glued up...
 
 This is he center of your flower...

 
 Take the 2nd flower and pop some glue in the center...

 
 Put the bud you created in the center and hold until stuck...


Take the 3rd flower and pop some glue in the center.. Lift the petals of the 2nd flower and stick in the middle of the 3rd flower, hold until stuck...


Put this to one side for a moment..


 Take the last 3 flowers and put glue in the middle of two of them..

 
 Then layer them one on top of the other making sure you offset the petals as above..


Once this has dried, take the first 3 flowers that you made into a bud and stick them in the middle...
 
Like so, once dried you can arrange the petals as you like, although I found it didn't need much doing to it at all...
 
For the leaves I cut out a large leaf from the Leaflets Framelits and cut it as above...

 
 Then I stuck them together...

 
 And glued them under the flower... They are so beautiful...


 This one I added some glitter around the edges of the petals..


I am afraid the photo's just don't do them justice, they really are quite stunning...


Hope you like today's Flower Tutorial, thanks for stopping by...
Happy Crafting X

Wednesday, 23 September 2015

Curvy Keepsake Wednesday

Hi there and welcome back to another Curvy Keepsake Wednesday..

Today I have a little Autumnal Box to share with you....

+
I have started with the basic Curvy Keepsake Box and cut out two in Chocolate Chip Card Stock....
 
Then using the Hardwood stamp and Chocolate Chip Ink I stamped the sides of the boxes... I used post it notes to mask off the bottom of the box as the stamp is rather large...


I decorated the box with some leaves I cut using the Leaflets Framelits and some co-ordinating card stock, ( I tend to use up any scraps of card in my scraps box for this).
 
I also used the New Acorny Thank You Stamp Set and matching Punch to create the embellishment along with some Bakers Twine...

 
And there you have it, a really cute little treat box for Autumn or Halloween... 


I hope you like this weeks box, thanks for stopping by...
Happy Crafting X

Wednesday, 16 September 2015

Curvy Keepsake Wednesday

Hello and welcome back to another Curvy Keepsake Wednesday...

This week we have a Sunflower Pumpkin Box, inspired by Autumn (or The Fall), I have made them into Thank You Boxes but you could use them for Thanksgiving or even Birthdays...

To make I cut two of the Curvy Keepsake Box parts, I then masked of the base using post it notes and then stamped the top parts using the Hardwood Stamp and Pumpkin Pie Ink.


Then I sponged around the edges of the box with Early Espresso Ink and adhered the two parts together. I used my bone folder to round the sides of the box slightly...


Then I cut out nine of the smallest flower from the Flower Fair Framelits out of Daffodil Delight and sponged the edges lightly with Early Espresso ink. I scrunched the flowers up and then stuck three flowers together. For the leaves I used the smallest leaf from the same set and cut out three in Mossy Meadow.


For the flower centers I used my blendabilities to colour three pearls and then placed them in the center of the flowers.


Finally I stuck them to the front of the box.


For the tag I cut out a larger leaf and stamped Thank You on the edge, and added a little Wooden Owl from my stash which I coloured Early Espresso. I attached it to the box with a tiny peg.


I hope you enjoyed today's Curvy Keepsake Box, Thanks for stopping by....
Happy Crafting X

Tuesday, 15 September 2015

Halloween/Autumn Double Fry Box

Hello and welcome back......

I was visiting Pattys Stamping Spot and saw this double Fry Box one of her team had created for Halloween and loved the idea so decided to recreate it.. however I don't really have much in the Halloween line as now my children have grown up and we don't really do much for Halloween any more....
Now I'm a bit of a hoarder, so I knew I had an old Stampin'Up Stamp Set with Halloween Pumpkins on somewhere so I dug it out......


The Fry Boxes are stamped with the Hardwood Stamp in Pumpkin Pie Ink before they are assembled ....


You then stick two Fry Boxes back to back, but because of the shape they won't go flat so you need to make side pieces to cover the join, check out Patty's tutorial on the link above.

Did you know that in America you can get Chocolate M&M's which taste like Candy Corn!!!!
and for a Candy Corn addict like myself they are to die for....lol.   We visited the M&M's store in New York and I came away with an enormous bag full and I still have a few left!!!


For those not in the Know Candy Corn is a big thing in America especially around Halloween and Thanksgiving time. It's very sweet and moreish, I love it but I know it's not everyones cup of tea as we say in England....lol  Apparently many Americans hate the stuff....go figure?


Anyway I made three of the double fry boxes and decorated them subtly Halloweeny by adding a little pumpkin held on with a tiny peg..


Then I made two single Fry Boxes which I decorated with leaves which I cut using the Leaflets Framelits.


I even stamped on some Tissue Paper to match...
MMMMMmmmmm well I'm all set for Halloween...yum yum...


Hope you enjoyed, thanks for stopping by....
Happy Creating X