Monday, 5 October 2015

Christmas Rose

Hi there and welcome back..

I have a beautiful flower to share with you today and its super easy to make... All you need is one of these...Stampin'Up! Fun Flower Punch.. Not got one just click on the picture at the end of this post to order one....


Aren't they just gorgeous, I'm calling them the Christmas Rose but you could make them in any colour for any occasion.. And here is how to make them...

 
First punch out 6 of the Fun Flowers... in what ever colour you want I used Real Red and Cherry Cobbler...

 
Then using your paper snips cut between each petal, making sure you don't cut all the way through...
 
Then using a paint brush or something similar you are going to curl the petals around the handle like so...

 
Then put 3 flowers aside and starting with one petal curl it around really tight and glue it..
 
Bring up the opposite petal and add a tiny bit of glue to hold it, carry on until all 6 petals have been glued up...
 
 This is he center of your flower...

 
 Take the 2nd flower and pop some glue in the center...

 
 Put the bud you created in the center and hold until stuck...


Take the 3rd flower and pop some glue in the center.. Lift the petals of the 2nd flower and stick in the middle of the 3rd flower, hold until stuck...


Put this to one side for a moment..


 Take the last 3 flowers and put glue in the middle of two of them..

 
 Then layer them one on top of the other making sure you offset the petals as above..


Once this has dried, take the first 3 flowers that you made into a bud and stick them in the middle...
 
Like so, once dried you can arrange the petals as you like, although I found it didn't need much doing to it at all...
 
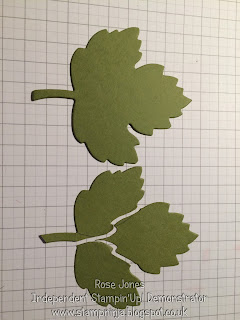
For the leaves I cut out a large leaf from the Leaflets Framelits and cut it as above...

 
 Then I stuck them together...

 
 And glued them under the flower... They are so beautiful...


 This one I added some glitter around the edges of the petals..


I am afraid the photo's just don't do them justice, they really are quite stunning...


Hope you like today's Flower Tutorial, thanks for stopping by...
Happy Crafting X

Sunday, 4 October 2015

Jingle All The Way Fox in the Snow

Hello and welcome back,

What a lovely day it's been, I've mown the lawn, done some gardening...but boy am I tired now....lol...
So today I have a gorgeous card designed by Michelle Zindorf, she does a lot of beautiful brayered cards and she sells her Tutorials, giving step by step instructions of how to achieve the same beautiful cards that she does. I must say I am not one for brayering haven't done it for a long, long time. So I purchased some of her tutorials and am going to give it a go again.....
This card is not brayering, to achieve the sky you drag your ink pad across the card and then there is some sponging so it wasn't too bad...

 
I love that cute little fox in the middle of the snow bound hills...

 
I cut out the trees using the Sleigh Ride Edgelits, the flourish in the background is from the Stamp Set Everything Eleanor, it looks like the wind blowing, clever huh....

 
The little fox has been stamped in Cajun Craze and is from the Stamp Set Jingle All the Way. ( If you buy this stamp set and the Edgelits together you save 15% off the regular price.)
 
Love, love, love this Whisper White Organza Ribbon, so glad it carried over to this year. it's got to my favourite, I love too that you can use your ink pads to colour the ribbon to co-ordinate with your projects. Gorgeous.....

 
This sentiment is from the Stamp Set Sassy Salutations and I stamped it in versamark and sprinkled white embossing power on and heat embossed it... There's Glitter on them there hills...lol . Dazzling Diamonds to be exact...
 
 
The moon is sponged through a 1" circle template with Whisper White ink...

 
Such a beautiful card, check out Michelle's Blog HERE its awesome..


I hope you like today's card, thanks for stopping by.....
Happy Crafting X

Saturday, 3 October 2015

Thinking Of You At Christmas

Hello and welcome back...

Today's card is almost the same as yesterday's but created a different way......

 
So instead of sponging the card before putting it through the Big Shot, I brayered versamark onto the Embossing Folder the side with the trees sticking up and put the plain card into the folder and through the Big Shot. Then I sprinkled clear embossing powder over and heat embossed.


Then I sponged over the card with Soft Sky, Marina Mist and Island Indigo and where you have heat embossed the ink doesn't take so you have lovely white shiny trees and a beautiful coloured background.


I made the banner in the same way but used the sentiment from the Stamp Set Embellished Ornaments and stamped it in Basic Black.

 
I used the smaller Label Punch to do the side bits and used Island Indigo card to go with the Island Indigo base card.

 
Instead of stamping the leaves directly on to the card I stamped them onto some Whisper White card and then cut them out and stuck them on to the card. The Bird was done in exactly the same way as yesterday and I cut out the branch freehand for the bird to stand on.


So here are the two cards side by side, I love both them but I am leaning towards the one on the right....


I hope you have enjoyed today's card, thanks for stopping by....
Happy Crafting X
Friday, 2 October 2015

Happy Wonderful Christmas

Hi there and welcome back...

Today's card features the Woodland Embossing Folder and An Open Heart Stamp Set with the beautiful sentiment from the Wondrous Wreath Stamp Set...

 
This card was inspired by one made by Michelle Zindorf, although I have had to improvise as I didn't have all of the products that she used. The gorgeous bird is from An Open Heart Stamp Set, its stamped in Basic Black onto Whisper White card and coloured in with Crumb Cake, So Saffron and Delightful Dijon Stampin' Write Markers. It is then cut out ready to attach to the card.

 
The background has been sponged using Soft Sky, Marina Mist and Island Indigo Inks (I didn't have any sponges so I used my daubers which didn't quite get the same finish), not too bad though.. Then you put it through the big shot in the Woodland Embossing Folder.
The next step is to brayer Smoky Slate ink over the raised trees, followed by Whisper White ink.

 
I hand cut the branch as I didn't have the Among the Branches Stamp Set (it will be on my next order though!!!) I sponged it with Smoky Slate  and Whisper White inks and then stuck it on the card. The tiny leaves are from the Perpetual Birthday Calendar Stamp Set (Very Useful) Instead of the Among the Branches Set ( I so need this set) and are stamped in Pumpkin Pie and Delightful Dijon.

 
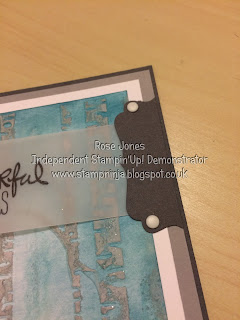
The beautiful sentiment is stamped in Basic Black onto Vellum and attached to the card and then I have taken a Decorative Label punched out of Basic Grey card, cut it in half and attached it to the side of the card, then finished it off with some White Candy Dots.

 
I'm still pretty pleased with the final card, check out Michelle's card HERE


Thanks for stopping by have a great day..
Happy Crafting X
 

Thursday, 1 October 2015

Woodland Christmas

Hello and welcome back....

Happy 1st October..... If you saw Tuesday's post then today's post is along the same theme, but instead of Halloween we are talking Christmas....


For each of these cards I created the background the same way as for the Halloween card, but instead of using a brayer to apply the versamark I just put the pad straight to the card so instead of just the trees being glittered the whole card is glittered...


I used the Scalloped Tag Topper to create the tag and stamped the beautiful sentiment from the Flurry of Wishes Stamp Set in Night of Navy on it and finished it with a bow made from Night of Navy Seam Binding Ribbon.


You can kind of get an idea just how sparkly this card is, its is just so beautiful, I love it....


 Here is another, this time I used Pacific Point ink..


 It's so pretty....


I love this sentiment too...I kind of wanted to write Follow the Star, but instead I stamped some stars and added a little star in he sky...


This one I used Island Indigo ink, which is my favourite?  mmm I don't know I love them all......


Hope you enjoyed, thanks for stopping by....
Happy Crafting X